
Planning a pergola for your Dubai villa is one of the most rewarding outdoor improvement projects you can undertake. Done right, it transforms your garden or terrace into a shaded, stylish outdoor room that your family genuinely lives in for most of the year. Done poorly, it can end up as an expensive structure that does not quite shade the right area, does not quite fit the garden, or does not hold up as well as it should in Dubai’s demanding outdoor conditions. The difference between these two outcomes is almost entirely in the planning stage. Here is a clear, practical, step-by-step guide to planning a pergola for your Dubai villa correctly.
Step 1: Define How You Want to Use the Space
Every good pergola design starts with a clear picture of how the space will actually be used. Before you think about size, material, or style, spend time thinking honestly about the activities the pergola needs to support. Do you want a shaded outdoor dining area where the family can eat together most evenings? A covered lounge zone by the pool with comfortable seating? An outdoor kitchen with a shaded prep and dining space connected? A sheltered spot for morning coffee with a view of the garden? The clearer you are about the primary use cases, the easier every subsequent design decision becomes. Write them down if it helps. Share them with your installer at the first meeting. Our team at Modern Shade begins every pergola work Dubai site visit with exactly this conversation because it shapes every design decision that follows.
Step 2: Walk Your Garden at Different Times of Day
This is one of the most valuable things you can do before any design conversations begin, and almost no one does it. The sun path across your specific garden changes significantly through the day and across the seasons, and the way it interacts with your villa’s position, surrounding walls, and existing planting is unique to your property. Walk your garden at 8am, 12pm, 3pm, and 6pm on a clear day. Note where the shade naturally falls at each of those times and where the sun hits hardest. Note where it is actually pleasant to sit at each time of day without any additional shading. This information is invaluable for positioning your pergola correctly and sizing it to provide shade exactly where and when it is most needed. When combined with side screens on the right aspects, this analysis allows you to design a outdoor pergola installation that performs well across the full range of daily and seasonal conditions.
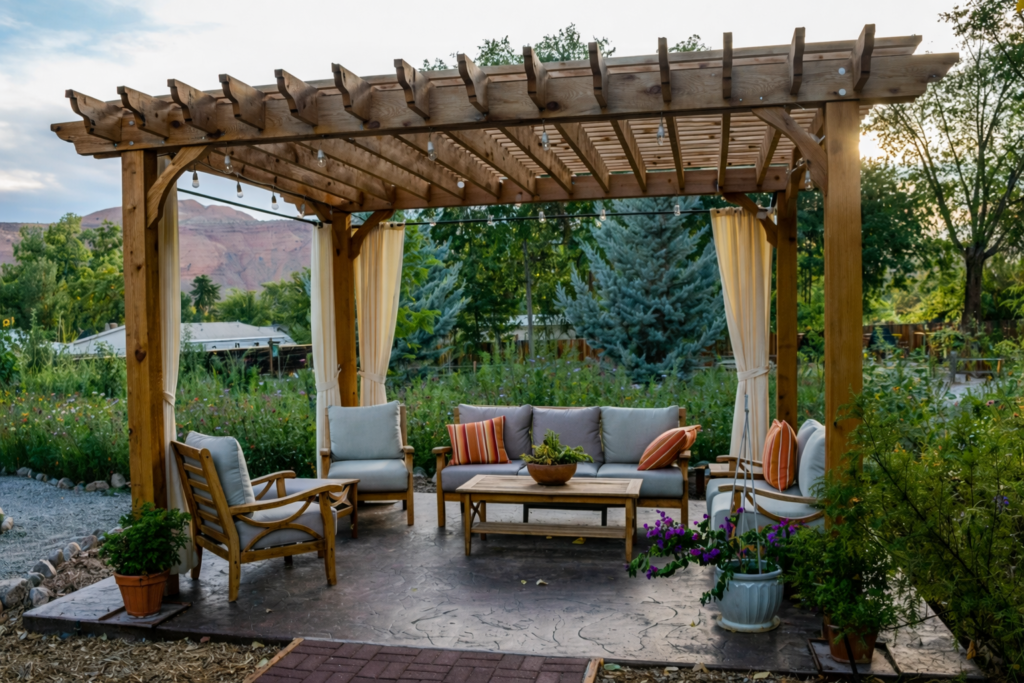
Step 3: Choose the Right Position
Position is arguably the most important design decision in any pergola project. A pergola in the wrong position will be undersized for its purpose, or will shade an area that does not need shading while leaving the area you actually use fully exposed. The most common positions for Dubai villa pergolas are directly outside patio or bifold doors as a covered extension of the living room; alongside or over the pool deck as a shaded sunbed and dining zone; in the rear garden as a freestanding destination structure; and on an upper terrace or rooftop as a covered outdoor room above the main villa level.
Each position has different structural implications. Wall-mounted pergolas that attach to the villa require fixing into the building structure and need to account for any cavity walls or external insulation. Freestanding pergolas need properly engineered ground anchors appropriate for the ground conditions. Rooftop installations require careful interface with the existing waterproofing and structural assessment of the roof slab capacity. Our pergola installation team in Dubai assess all of these factors during the site visit as part of our standard design process.
Step 4: Select the Right Material for Your Needs
Dubai’s climate demands that material selection be driven by performance requirements as much as aesthetics. The two main options for Dubai villa pergolas are powder-coated aluminium and UV-treated hardwood timber, each with distinct characteristics that suit different priorities and preferences.
Aluminium is the most practical choice for most Dubai homeowners: rust-proof, maintenance-free, available in any RAL colour including realistic wood-effect finishes, and structurally efficient enough to span large areas with fewer support posts. Our aluminium pergola installation service covers flat-roof, gable, louvered, and bioclimatic motorized systems. Timber delivers genuine natural warmth and character that aluminium cannot fully replicate, and is the right choice for clients who value that authentic aesthetic and are prepared for the maintenance commitment it requires in UAE conditions. Both materials can produce outstanding results when properly specified and installed by experienced professionals.
Step 5: Decide on Your Roof System
The roof system you choose determines how much control you have over shade, weather protection, and ventilation beneath your pergola. A solid aluminium or polycarbonate panel roof provides consistent shade at all times and full rain protection, but no ability to adjust the amount of light or airflow. A slatted or louvred fixed roof provides some shade with some natural airflow. A motorized bioclimatic louvered system allows real-time adjustment from fully open to fully closed at the touch of a button, giving complete control over the outdoor environment across every season and time of day. A fabric canopy provides shade and a soft aesthetic at a more accessible price point. Think about how you will actually use the space across different seasons, and choose the roof system that gives you the right balance of performance, control, and budget for your specific requirements.
Step 6: Plan Your Add-Ons from the Start
The accessories you want in your pergola should be planned from the very beginning of the design process, not added as an afterthought once the structure is already built. Integrated LED lighting is far cleaner and less expensive to install during the initial build than retrofitted later. Side zip screens need to be accounted for in the structural frame design. Misting systems need water supply connections that are ideally routed during installation. Smart motor systems need power supplies and conduit routing that should be designed in from day one. Our pergola supply and installation team always discusses the full accessory specification at the design stage so nothing needs to be compromised or revisited after installation.
Step 7: Check Community Approval Requirements
Many of Dubai’s villa communities require developer or homeowners association approval before permanent outdoor structures can be installed. Communities like Arabian Ranches, Dubai Hills Estate, The Springs, The Meadows, Palm Jumeirah, and Emirates Hills all have specific guidelines on structure types, sizes, and design standards. Getting approval before starting any work saves significant potential problems later. An experienced pergola contractor in the UAE will be familiar with the approval requirements of the major Dubai communities and can help you understand what documentation is needed and how to prepare it correctly.
Step 8: Get the Installation Right
Even the best-designed pergola will underperform if it is not installed correctly. Structural fixing that does not account for UAE wind uplift loads, powder-coat specifications that are not rated for UAE UV levels, fixings that are not stainless steel or hot-dip galvanised in coastal environments, electrical routing that is not properly weatherproofed — all of these installation decisions affect how your pergola performs and how long it lasts. Working with a company that installs with its own trained teams, backs its work with a genuine warranty, and has a track record of completed projects across Dubai is the most important decision in the entire planning process. Contact Modern Shade today for a free site visit and no-obligation consultation. Our experienced team will walk your garden with you, help you work through every one of these planning steps, and develop a design and specification that is exactly right for your Dubai villa.